Slack and other chat software tend to retain conversation history so that you can see and search what was said in the past. This can be very helpful for historical context and avoiding repeat conversations, but there’s all kinds of reasons why you don’t want to retain backlogs indefinitely:
people who join some time after the Slack is formed may find themselves being discussed in backlogs in terms that are uncomfortable now they can see it
the relationships of people in the Slack may change over time and previously friendly conversations may be weaponised by members
any malicious person who gains access to your Slack (whether by hacking or by being invited) gets the entire history of everything said there to bully or blackmail people with
the contents of the Slack might be subject to legal discovery at some point in the future and be used to win a lawsuit against members or owners of the Slack, or else simply dumped into the public record
Alternatively, slack_cleaner2 is nicely flexible if you want to develop your own script. Or members could delete at least their own messages with eg the Message deleter for Slack 2.0 Chrome extension.
Script caveats
You will need owner or administrator access to your Slack instance (or else you cannot delete messages other users wrote).
The script operates with the credentials of the admin who runs it, and will not be able to delete other people’s messages in 1:1 DMs, or any messages in any private channel that admin is not in.
The script will not delete messages older than the 10,000 recent messages that free Slacks have access to (even deleting the newer messages doesn’t restore access to these). Yet these older messages are retained by the company and could be accessed if, eg, someone pays for the Slack in future or if a discovery motion is granted. Unfortunately, you will need to pay for Slack, at least briefly, to access these older messages for deletion.
I’ve been using my “fan merinos” random word generating script for a long time, and increasingly regularly as I take part in a few forums with transient pseudonymity and it’s a useful way to quickly get a pseudonym:
$ rw 1

mortally
Sure. Pseudonym activate. Yours, “Mortally”.
The result has been though that I increasingly return to my desktop to find that I’ve opened about 15 terminals and run rw in each and abandoned them.
How useful it would be to have a GNOME notification generated via a keyboard shortcut! Eg I could press Ctrl+Alt+R and get:
Putting all this together takes a bit of work. First, the shell script to create the notification:
#!/bin/bash
WORDS=/usr/share/dict/words
NUM_WORDS=5 # fits nicely in a notification for me
Save to, eg ~/bin/rw-notify.sh, and then make it executable: chmod 700 ~/bin/rw-notify.sh
If you run the command from a terminal you then get the notification.
But for some reason I haven’t worked out, GNOME’s keyboard shortcuts won’t run a shell script. If you try and add a shortcut that runs this command, it will simply do nothing.
So, next create another file: ~/.local/share/applications/rw-notify.desktop:
#!/usr/bin/exo-open

[Desktop Entry]

Name=Random Words Notify

Exec=[YOUR HOME DIR]/bin/rw-notify.sh

Type=Application
Replacing [YOUR HOME DIR] with the location of your home dir, eg:
Exec=/home/mary/bin/rw-notify.sh
This will let you activate an application called “Random Words Notify” from the GNOME launcher.
Last step, binding it to a key.
First, you need to have /usr/bin/exo-open available on your system (for some context, see GNOME bug 343896). On Debian and Ubuntu, you’ll need to install exo-utils and on Fedora exo.
You will also need to make the desktop file itself executable: chmod 700 ~/.local/share/applications/rw-notify.desktop
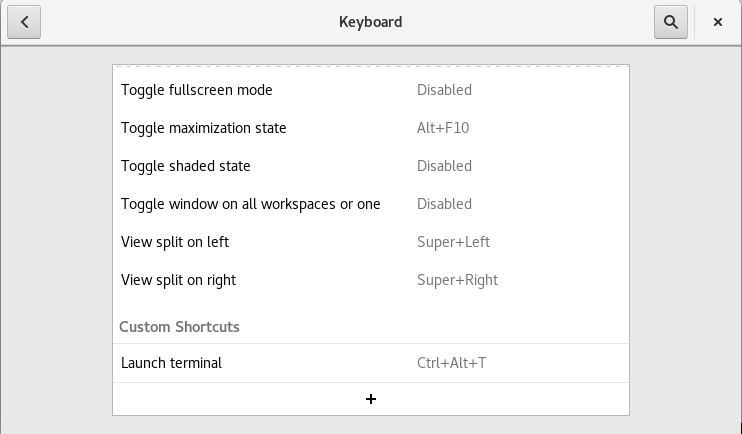
Now, finally open the keyboard shortcuts editor (open the Activities view and start typing “Keyboard”). Scroll to the bottom and press the + to add a new custom shortcut:
Then press “Set shortcut” followed by the keys you want (in my case, Ctrl+Alt+R), and fill in a name and, as the command, the full path of the rw-notify.desktop file, eg /home/mary/.local/share/applications/rw-notify.desktop:
Press “Add” and now Ctrl+Alt+R will bring up 5 random words in a notification for you:
All shell scripts and commands in this post (enclosed in the <code> HTML tags) are in the public domain.
In January 2017, as people considered the implications of the server move to Russia, I saw a number of people hesitant to delete their accounts as they were hoping to overwrite their data on Livejournal before deleting, by, eg, replacing their entries with Shakespeare’s plays, or with random nonsense, so that Livejournal didn’t have the entry any more. This won’t work and you might as well just delete your Livejournal account.
Here’s a loose analogy for the way that data on a site like Livejournal may be stored:
There’s a journalling website. It stores its entries on vast reams of paper in a giant library and new entries are scribed onto paper and filed.
The “overwrite with nonsense” strategy assumes that any journal entry you make is at a fixed location on a fixed bit of paper for all time. When you update the entry, the scribe goes to the existing bits of paper and writes on top of them. While this is technically possible with hard drives and similar, in a way that it isn’t with literal paper, here’s what more likely actually happens:
You update the entry, replacing it a Shakespearean play. The new version is written on entirely random empty paper (maybe blank, maybe where someone else’s deleted entry once was), and an index in a different part of the library is also updated. It used to say that your entry of January 7 was on floor 6, shelf 216, and now it says that your entry of January 7 was on floor 12, shelf 16.
But the contents of floor 6, shelf 216 are likely not overwritten for some time. Perhaps they’re marked as available to be overwritten, to be reused whenever it seems sensible, but you won’t know when that is. On the other hand, perhaps they are deliberately marked in the index as “an old version of the January 7 entry” for the sake of users having an edit history, or to have an audit trail, or because a lawsuit demands it, or because a government demands it. This may or may not be visible to you.
Even if floor 6, shelf 216 is marked available to be overwritten, it may not be actively erased, and if it isn’t actively erased, it’s available to be searched by a sufficiently determined or empowered person. (And searching unindexed digital storage is a lot faster and cheaper than searching paper, so not one thousandth as determined or empowered as you need to be to search a library full of unindexed paper.)
And even if floor 6, shelf 216 is no longer marked as “an old version of the entry of January 7”, on any moderately well-run website, floor 6, shelf 216 was never the only copy of your entry anyway. What if there was an accident with fire or water or whiteout? There are backups of your entry, probably at least two in the same library and at least one in a different library. These backups are usually moments in time, ie, the state of the entire journalling website as of New Years. The state of the entire journalling website as of New Years the previous year.
These backups are almost certainly never wiped of entries that are simply edited, and without adding a system that searches back through backups and selectively deletes backups of deleted accounts, they most likely contain the complete contents of deleted accounts as well.
So what you’ve ended up with is a situation where floor 12, shelf 16 contains a Shakespearean play, floor 6, shelf 216 likely contains your original entry, and there are several backups around that almost certainly contain your original entry and are designed in such a way as to be found and restored relatively quickly. This is not a much more secure situation than before you replaced the entry with a Shakespearean play; probably not worth the work you did.
All that said, it’s important to know that there are trade-offs in adding secure, permanent deletion. People quite often edit or delete their data accidentally, or temporarily — for example it is quite common to disable social media accounts temporarily to enforce a social media break — and it’s also common to be hacked and have your data deleted by the hacker. Enthusiastic data scubbing will actively harm you in all these cases. On top of that, storage systems fail (in my analogy, the library burns down, except hard drives fail more often than paper does), and backups are especially important then. And any system that goes back in time and edit backups has risks; what if it has a bug (all software has bugs) and deletes things it shouldn’t? System design to balance securely deleting data that users want to permanently delete with rarely or never deleting data they expect to keep is not easy.
So Livejournal or another site has your personal data, what should you do? I suggest that when you no longer use an online service, or you no longer trust in its management, that you take a personal backup of the data if possible and if you want it, and then delete your account.
You cannot usefully take any additional steps like overwriting your account with nonsense to ensure that actual data scrubbing took place and you should assume that it wasn’t scrubbed unless you can find some written guarantee otherwise. However, over time, backups will get selectively pruned, outages will happen, the business may eventually fail and your data will most likely become slowly less available and complete. That’s the best you can do.
For online services you actively use and where you do trust the management enough to keep your account, ask for written descriptions of their data scrubbing practices to be developed for deleted data and deleted accounts, including deletion from backups and handling of disused hard drives.
Disclosure: I am an employee of Google. This post does not describe Google’s data deletion practices, in which I’m not an expert in any case; it’s a general description of easy, sometimes harmful, defaults that systems designers could fall into. For Google-specific information, you can view privacy.google.com and Google Infrastructure Security Design Overview.
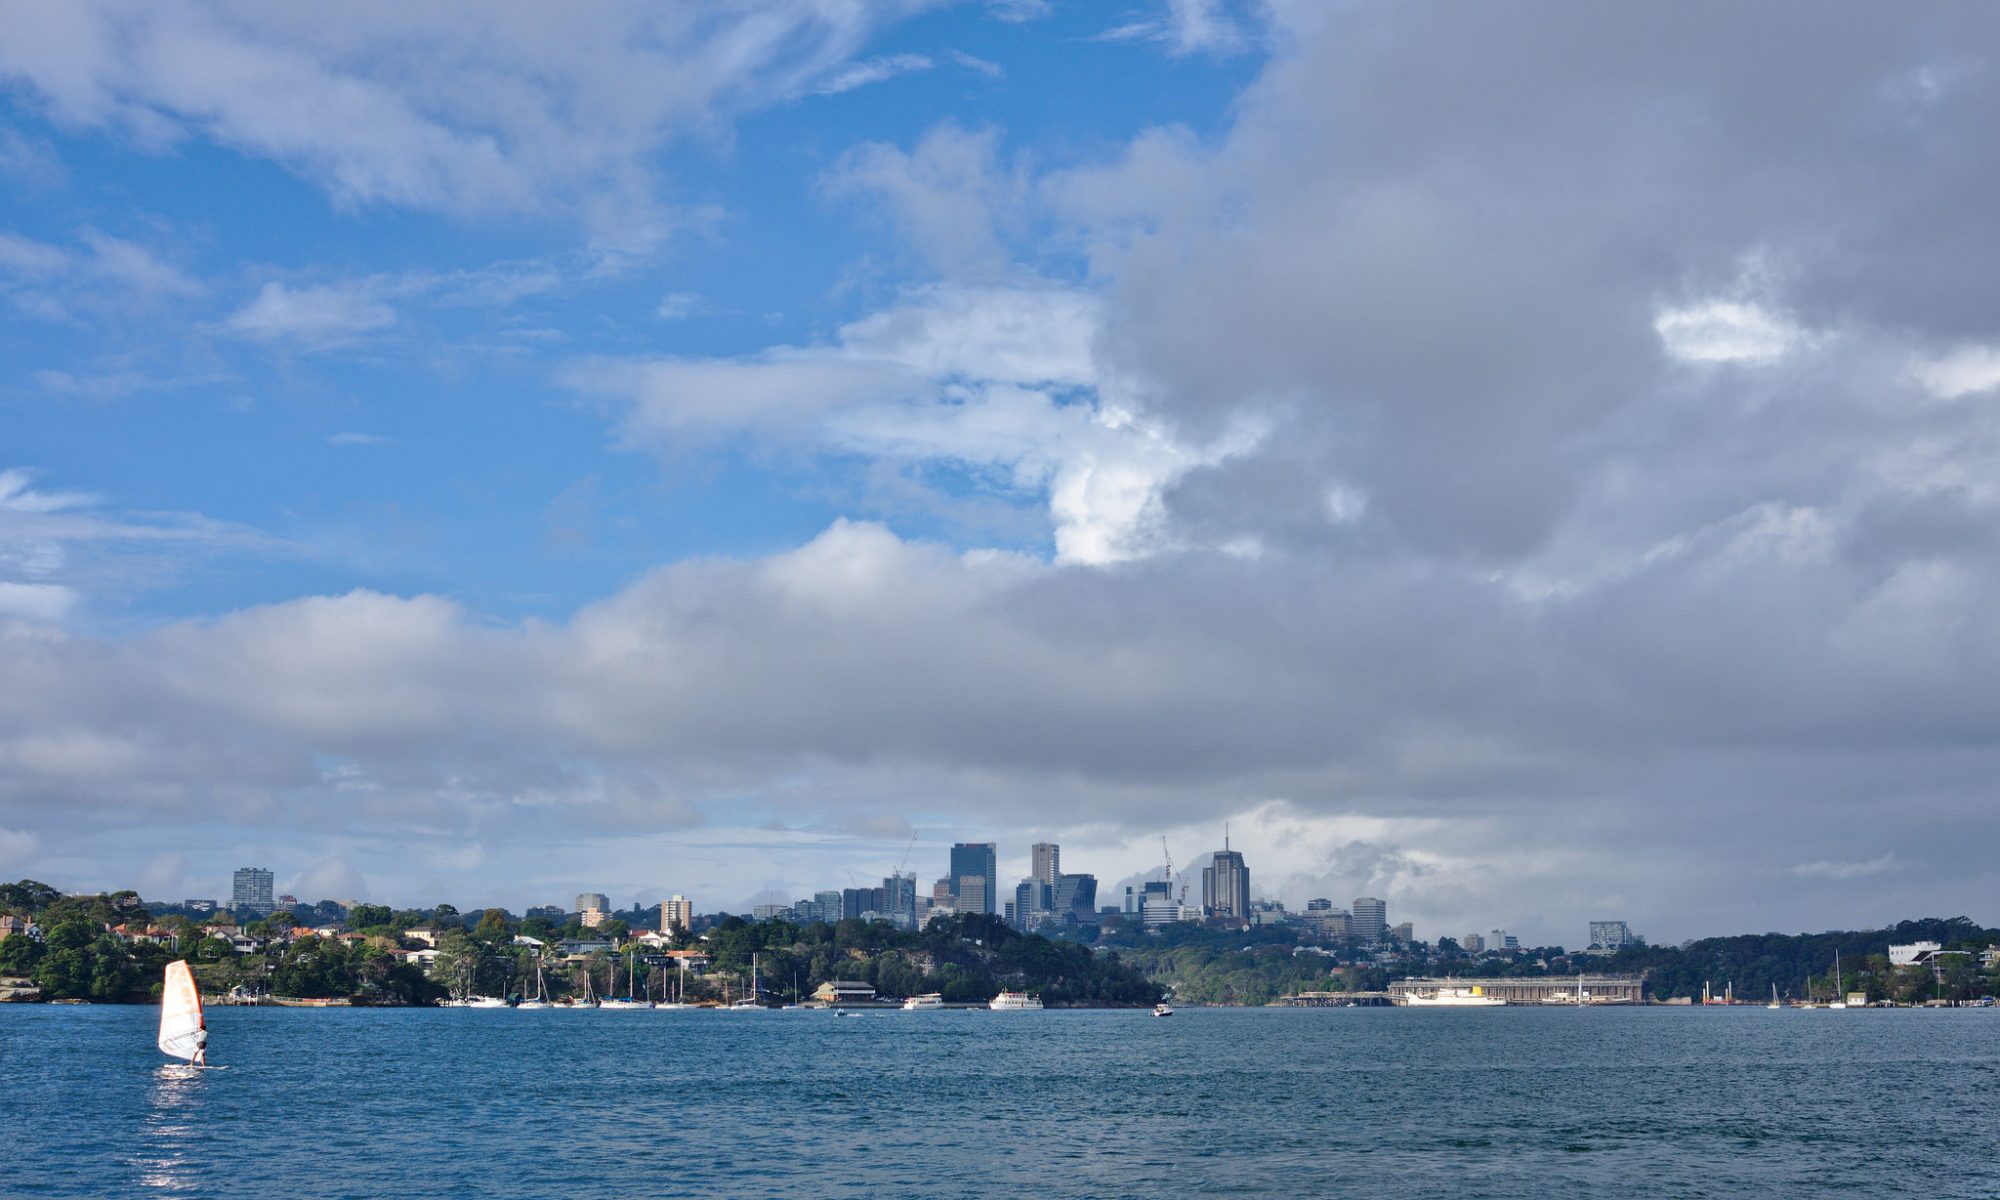
As the planning for the sale of Yahoo!/Altaba to Verizon continues, I’m not the only person worried about the fate of Flickr, which has been owned by Yahoo since 2005:
Remember to post a picture of yourself kissing your photos goodbye to Flickr
I’ve got a tediously backed-up local copy of my photos and won’t have to kiss them goodbye, but as a happy Pro user of Flickr I’m really worried about its future and beginning an active search for replacements. I’m going to start evaluating possible replacements on the basis of these specific features, roughly in order of importance:
My favourite Flickr features
Embedding my foremost use of Flickr is as a photo host for my parenting blog and, increasingly, to show off my best photos. The ability to embed photographs in third-party websites is essential to me.
Locking at the photo level and guest access. It’s not easy to find non-recent photographs of my children on my Flickr account. That’s because I have a script that marks photos as private once they’re a certain age. Some other types of photos (for example, photos of other children) I often mark as private immediately.
Much of my web life runs this way: just because you can find my recent stuff doesn’t mean you get to casually browse everything I’ve done on the Internet since the beginning of time (circa 1999). I’ve taken full advantage of websites with individual locking every time I’ve used one, including WordPress sites, LiveJournal&Dreamwidth, Pinboard, and, yes, Flickr, and strongly prefer it.
At the same time, the chance of people who care about me obtaining a login to Flickr, or to social-photos-site-of-the-month in order to view pictures of a party we were at is basically nil, so the ability to share links to photos via Flickr’s guest pass system has made it useful to me for semi-private events and photos.
API access. I’m not locking all this stuff on all these sites down by hand! It’s all scripted and done via APIs.
Multiple albums for a single photo I look at my photos through several different types of, uh, “lenses”. There’s events, there’s individuals in the photos (mostly my children), and there’s my show-off albums for my favourite photos or ones most I’m likely to want to share with other people if only they’d ask to see more of my photos. I use albums for all three ways of looking at photos, and thus many of my photos are in both a “my kid at age 3” album and a “visit to the beach in November” album.
I also use tags and I might be able to modify my workflow to use tags to replace some of these features, although the result of a tag search would need to be viewable as a first class album, rarely true in my experience so far.
Creative Commons licencing. I like easily dropping my photos into a big pool of photos that might someday find good uses elsewhere and licence a lot of my non-portraits CC BY for (nearly) maximum re-usability. I fear that even sites that support CC licencing won’t end up being searched by anyone in practice, and if I note a CC licence myself in the description, it’s never going to happen.
Features I’d reluctantly sacrifice
Chromecast support. It’s been really enchanting having our TVs display great photos of our kids throughout their lives, travel we’ve done, and a lot of clouds, all via Chromecast’s support for using Flickr photos for background images, but I’m willing to give it up for my core set of features.
An app. Don’t get me wrong, I do like being able to peruse my photos on my phone, but I’d give it up if I had to. Because I do about half my photography with a DSLR, and edit essentially all my photographs, I don’t upload photos via apps in any case.
Less important
The social ecosystem. I started using Flickr regularly after a lot of people stopped, and I’m indifferent to the social features, eg favourites, comments, following other folks, putting my photos in group albums. I do use some of these, but I won’t be looking for them in a replacement.
Locking to different sets of people. I do use Flickr’s “friends” and “family” distinction a little, but in giving up social, I’m also happy to give up locking other than “locked” and “not locked”.
And now, I’m afraid, it’s well and truly time to go shopping for a new photo host. My favourite. Only not.
Signal-boosting this news as I know a few people still maintaining a LiveJournal who might choose to delete it, or change their use of LiveJournal after learning about this.
LiveJournal is now hosted in Russia
As of late December 2016, the LiveJournal servers (computers) are now hosted in Russia. While LiveJournal has been owned by Russian company SUP since 2007, the servers had until now been hosted in the US and access to them somewhat controlled by Californian law.
SUP has, to the best of my knowledge, not announced or commented on this themselves, but there’s more information at rahirah’s Dreamwidth journal with links to different evidence of the new location of the servers.
A Russian-language LiveJournaller appears to report that Russian law then allows that all the confidential information of [LiveJournal] users is available for [Russian] domestic security services in real time [note though that that’s a automated translation].
A new law imposing restrictions on users of social media has come into effect in Russia.
It means bloggers with more than 3,000 daily readers must register with the mass media regulator, Roskomnadzor, and conform to the regulations that govern the country’s larger media outlets.
Internet companies will also be required to allow Russian authorities access to users’ information.
if you’re in Russia or vulnerable to Russia, and a political opponent, you could now be more easily identified by Russian security
regardless of where you are, your LiveJournal could be possibly be deleted without notice for expressing opposition to Russia or its interests or for other content censored in Russia (eg LGBT-related content)
the flight of LiveJournal users from LiveJournal following this news could simply kill the business and cause everyone’s journals to disappear without notice (Archive Team is storing public entries, regarding it as an at-risk site)
Readers’ connections to LiveJournal aren’t private
What this means is that the content of any entries you read, including locked ones by both you and other people, are trivially visible to anyone who can eavesdrop on your net connection, including (often) other people on your local network, and anyone on the path between you and LiveJournal such as your ISP and anyone with access to the data flowing across international cables or access to the data as it enters the Russian hosting facility, whereas https connections are encrypted in a way such that those people can see that data is flowing but can’t read it absent considerably more niche and intensive technical measures. (Even if HTTPS were turned on by LiveJournal, you wouldn’t be safe from the Russian law, since they can ask LiveJournal itself to turn over your data in addition to whatever nation-state attacker level techniques they can employ.)
Given my experience with LiveJournal RSS feeds, I’m fairly sure this has been true for some time, predating the move of the servers to Russia. (Here’s one other report that this was already true as of September 2016.) Regardless of timing, this speaks of, at best, disregard for the privacy of their users’ explicitly private (because friends-locked!) information. It’s 2017, mandatory HTTPS for transmission of any data that is sensitive or might, conceivably, somehow, maybe, be sensitive is an absolute minimum standard for user safety. LiveJournal doesn’t even have optional “if you have HTTPS Everywhere installed” or “if you remember to stick the s into the URL yourself” HTTPS (which would still be insufficient as you cannot control whether your readers use HTTPS when reading your journal).
Getting your content out of LiveJournal
If based on this you choose to delete your LiveJournal, here are some options to keep your entries. This list isn’t comprehensive.
If you want to move the content to another website, here’s some blogging platforms that provide imports from LiveJournal:
Dreamwidth (hosted software based on the LiveJournal code and with similar features such as locked entries, mandatory HTTPS still under development in January 2017in opt-in beta from February 2017)
If you want to download your entries for private use, you can:
use LiveJournal’s own export tool but rather painfully (you’ll have to do one download per month), and without comments
use ljdump on the command line, which worked for me as of 2015 when I deleted my LiveJournal, but will require that you’re an experienced command line user
use BlogBooker to export it to a Word or PDF file (disclosure: I haven’t used this site in quite some time, and would appreciate hearing if it works, but I suggest people at least try it because it exports to a non-programmer friendly format that people could keep as a private archive, and claims to include comments and images)
If your LiveJournal made use of their photo hosting, I am not sure which backup solutions will import your photos or how they will be stored. I am also not aware of any import tool that replaces LiveJournal entries with a “this entry has moved to URL” message or similar. If anyone is working on a competing LiveJournal import/export tool, photo export and redirection text are both features that my friends and I would have found useful at various times.
I’m known in a few Slacks as the emoji whisperer for adding obviously necessary yet inexplicably absent emoji.
Sometimes, as in the case of the nopetopus and the WTF cake, a certain amount of time in Inkscape is going to be necessary, but I’d say that I whisper around ⅔ of my emoji via downloading images just two websites, and what’s more you can too! (It’s just that easy!)
Emojipedia contains existing and, importantly, upcoming and proposed Unicode emoji. I used it to get hold of unauthorised pre-approval user-beware emoji for avocado, duck, and fingers crossed.
openclipart contains whatever people want it to contain. Aside from providing sources for many of the puzzlemoji, I’ve recently found good witch and wizard hats there. Most of the images can’t be shrunk to 128px and still be made out, but there’s enough that can to make the search worth it.
At an engineering training with Greg Sabo in my first week at Stripe, he showed a cute trick: using a shell command to generate two random words when testing.
For example, every time I reconfigure my mail server, I send a distressing number of emails in this style:
echo "Testing" | mail -s "Mary Test 1" mary

echo "Testing" | mail -s "Mary Test 2" mary

echo "Testing" | mail -s "Mary Test 3" mary
(I usually lose count around Test 4, for the record.)
Wouldn’t those be both more fun and somewhat easier to find in mailboxes, logs and dashboards as, say, Mary test fan merinos and Charge for cellular ascendents respectively? It would be! Thanks Greg!
Implementation-wise, on very recent Ubuntu, the trick is to add something to your bash profile along the times of:
Background: shuf is a command that behaves like head and tail, only it returns a selected number random lines. I’m filtering out single quotes (grep -v "'") in its input so as to not unduly annoy xargs, and filtering capital letters (grep -v "[A-Z]") as a proxy for filtering out proper names.
From there: $ rw newscaster mucky
$ echo Mary test $(rw)
Mary test equitable rough
As a note of caution, you don’t want to run rw live in front of other people or send them the output unchecked; a random selection of 2 English words has some reasonable chance of being disgusting, offensive, strange, inappropriate, etc. Generate some memorable phrases privately in advance!
Select the domain you want from the dropdown, check the box next to ‘By checking this option you agree to the Let’s Encrypt Terms of Service.’, leave ‘Unique IP’ unchecked, and press ‘Add now’.
Important: wait for an email from Dreamhost telling you the certificate is ready. This seems to take about fifteen minutes or so. The email contains a copy of the certificate but you don’t need to do anything with it, they configure the webserver automatically at about the same time as they send the email.
Once you have received the email, check that your site is available at https://YOUR-URL and that your browswer does not report errors. (If it does, wait around 15 minutes, try again, and if you’re still seeing errors, screenshot them and contact Dreamhost support.)
Now that HTTPS is working on your site, you can then force all HTTP requests to redirect to HTTPS by placing this in the ~/YOUR-URL/.htaccess file:
# tell web browsers not to even try HTTP on this domain for the next year
# uncomment this only after you've confirmed your site is working on HTTPS, since it commits you to providing it over HTTPS
# Header set Strict-Transport-Security "max-age=31536000" env=HTTPS
Check that visiting http://YOUR-URL now redirects to https://YOUR-URL, and the same should be true of pages underneath http://YOUR-URL.
Feature request for Dreamhost: make a “force HTTPS” option in your standard config.
If your site is a bunch of static HTML files, and you have done a lot of absolute linking to your own webpages, here’s a possible command you could run, replacing example.com with your own domain. I don’t recommend running it unless you know the UNIX command line, and you have a fairly good idea of what find and sed both do:
DOMAIN=example.com

cp -a ~/$DOMAIN ~/$DOMAIN-backup-before-https-edit

cd ~/$DOMAIN

find -type f -name "*.html" -exec sed -i "s/http:\/\/$DOMAIN/https:\/\/$DOMAIN/g" {} \;
We stuck with the Logitech Squeezebox system for streaming home audio long long past discovering that Logitech was ending development of the ecosystem but inevitably it started to date. Our Squeezebox Classic didn’t survive our house move in May. Our Squeezebox Boom and Squeezebox Radio did, but over the last year Andrew subscribed to Google Play Music, I switched to a podcasting app (Pocket Casts) for my phone rather than a command line tool that downloaded new episodes (podget), and so more and more things became phone-only and unable to easily send audio to the Squeezeboxen.
We like whole-home audio (the ability to play the same thing throughout the house), so even aside from audio quality issues, Bluetooth wasn’t going to cut it. I started to look into switching to the Sonos system, but it was another all-in system where we’d be looking at replacing all of our equipment if Sonos went out of business or end-of-lifed their setup. Logitech, you’ve done a number on the hardware side of whole-home audio systems. So we’ve switched to using good speakers with fairly cheap and disposable ecosystem adaptors, ie, the Chromecast Audio.
Software:
ReadyMedia (formerly MiniDLNA), which we were already using to stream video to the TV, let’s us continue having access to the audio on our Ubuntu home server
BubbleUPnP to send audio from the home server to the Chromecasts
ReadyMedia has to be one of the easiest to configure Linux services I’ve ever dealt with. I’m intending to play around with BubbleUPnP Server in front of ReadyMedia shortly; shared playlists are still a Squeezebox feature missing from this setup so far.
We also needed speakers to replace the Boom and Radio (we could have used their line in function, but we’ll sell them to continuing Squeezebox users). Thus, new equipment to go with the set of Yamaha MSP5 powered speakers we already have:
The mixer is something of a revelation: we’re feeding the TV audio and a Chromecast into it, in order to be able to listen to either of them through the Yamaha speakers without having to press any buttons or even use any kind of remote. Obviously we pretty much never want to listen to the TV and the Chromecast outputs simultaneously; but we can now listen to them in very rapid succession and the energy needed to decide to listen to music in the lounge room is way way lower than it was. Long may the Hamilton cast recording, Justice Crew’s Que Sera, and Doctor Who podcasts be heard around our house.
Graphics have been spicing up my writing and slidedecks over my fifteen years as a writer and a public speaker; the simpler and more attractive the better. But it’s not easy to put them there.
I’ve had the good fortune to also have been an amateur photographer the whole time, and have taught myself some basic image editing skills, so when I find an image that’s not quite right but could be, I pop it in an image editor, twiddle a reliable and small set of dials, and out emerges something more eye-catching. Lucky me. And lucky you: the tricks to turn a photo into something simpler and more eye-catching are simple, and today is the day I share my version of them.
Are you a wordsmith more than an visual person? Are you a writer or a public speaker who appreciates the power of a strong visual in other people’s pieces and slide decks, and wish you could just twiddle a few dials and make it happen with your own images? Do you want to make featured images for a WordPress theme, or something to break up a millionty paragraphs of text, or a colourful image to re-engage your audience in your talk? Do you sometimes have an idea of what you want but the images your searches dig up are just a bit flat for your purposes? This is for you.
This entry covers two topics: first, finding existing images that you can make work for you without any further editing. Win! And the next level: when you have an idea of what you want, and you have a photo that… doesn’t quite tell that story… but could… it’s time to make some quick and dirty edits to liven it up. Make the colours a little stronger or stranger, eliminate some clutter, and pull out some detail. Your illustrations are complete!
Eye-catching photos for wordsmiths: principles
Eye-catching images accompanying to your writing or speaking should be brain candy: simple subjects that people can identify at a glance; high contrast so that most people can understand what they’re seen quickly; and understand at a glance; and brightly or interestingly coloured because it’s eye-catching and fun. Your illustrations will usually be a subtlety-free zone.
Luckily simple, colourful, and easy to understand is an appealing set of things to have in a photo, so you’ll often be able to find free photos that you can use without editing. But there’s also a very simple set of tools that will let you take an existing photo and up its simplicity and eye-catching for your work. Finding first; then failing that, editing.
Finding images
Use photos that the photographer allows to be used and changed by other people! The Creative Commons system provides photographers and others with a way to give you this right.
To find images with Creative Commons licences that match my needs, I head on over to Flickr search, with Commercial use & mods allowed selected in the “Any licence” drop down. A couple of Flickr search tips:
search for generic terms. If you’re looking to make a point about time, first search for “clock” and “watch” and “sundial”, not things like “clock showing noon” or “bedside clock”. Images are often fairly generically labelled by their creator and you miss some good stuff by going specific.
use Flickr’s “Interesting” search tool. There’s a dropdown labelled “Relevant” — by default Flickr is trying to find images whose textual description and tags best match your search term. Try changing it to “Interesting”, to instead find somewhat matching images that are very popular on Flickr. This will often bias towards images that are already technically good, highly saturated, have an unusual subject or setting, and similar; exactly the kind of eye-catching things you want for your blog post or slide deck.
Flickr isn’t the only Creative Commons game in town: there’s also Wikimedia Commons or Google Images (after your search, go to “Search tools”, then “Usage rights” then “Labeled for reuse with modification”.
Caution: often images found this way must still be credited to their creator. Learn more here. Caution: be careful of images with recognisable people in them. The permission you got to use the image was from the photographer, not the subject. Ethically, the person in the photo may not wish to have their likeness appear with your content, and in some cases using images of people may be restricted by personality rights or privacy rights. It’s usually best to skip images of people, or to buy them from a reputable stock image site.
The point of this tutorial is to make adjustments to some of the most common “knobs” you can twiddle on digital images. If you want to start making edits, and you already have a tool in mind, look up how to crop, how to auto adjust levels, how to change saturation, how to change contrast, and how to change brightness in your chosen graphics software.
In this tutorial, I’ve made the edits to images with Pinta, a free and comparatively simple graphics program for Windows, Mac, and Linux. I haven’t used them, but Paint.NET is a widely recommended equivalently straightforward Windows image editor, and Pixelmator seems highly recommended on Mac.
Editing photos to be eyecatching: short version
crop the image so that the subject of interest comprises most of the image, and is off-center
try auto-level colour adjustments
try somewhat increasing one or more of contrast and saturation, perhaps while twiddling brightness up or down
also try decreasing saturation
That’s it! If you want examples of what this looks like in action, read on!
Editing photos to be eyecatching: with examples
Meet our original images
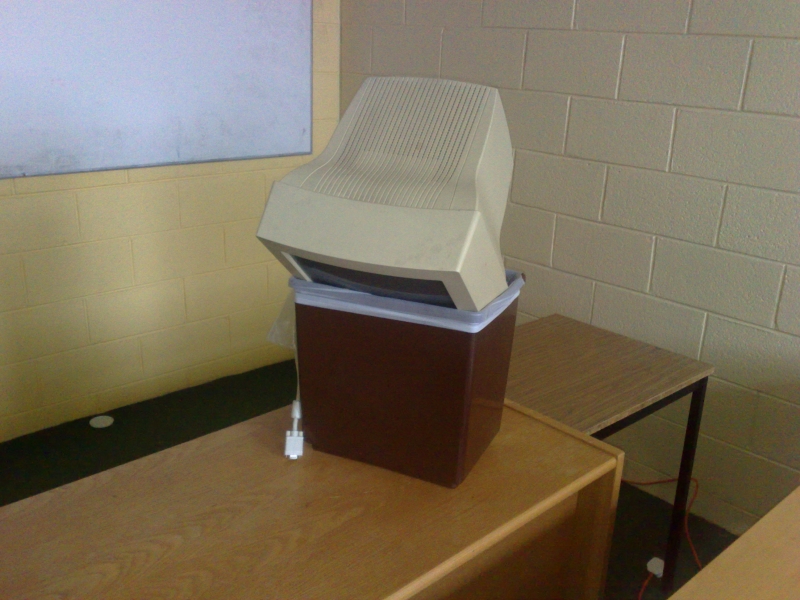
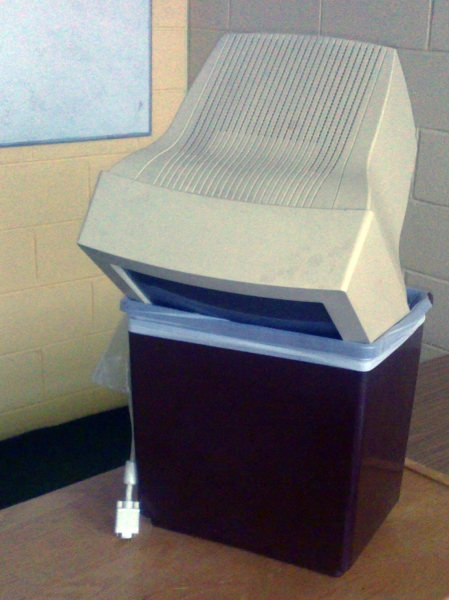
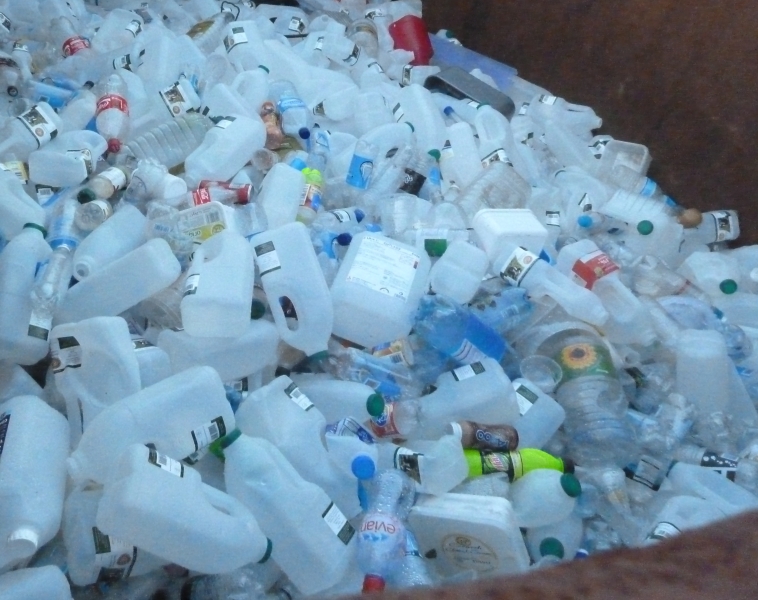
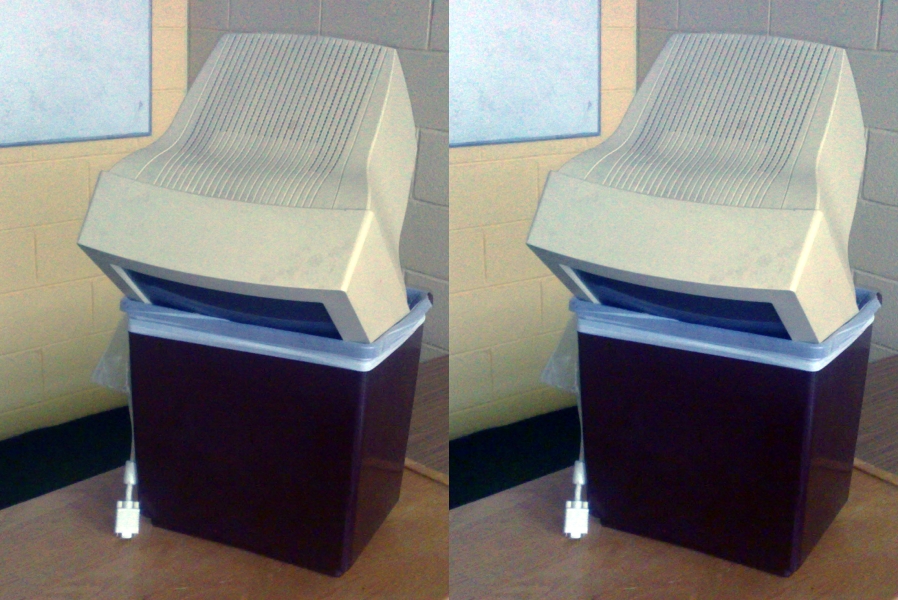
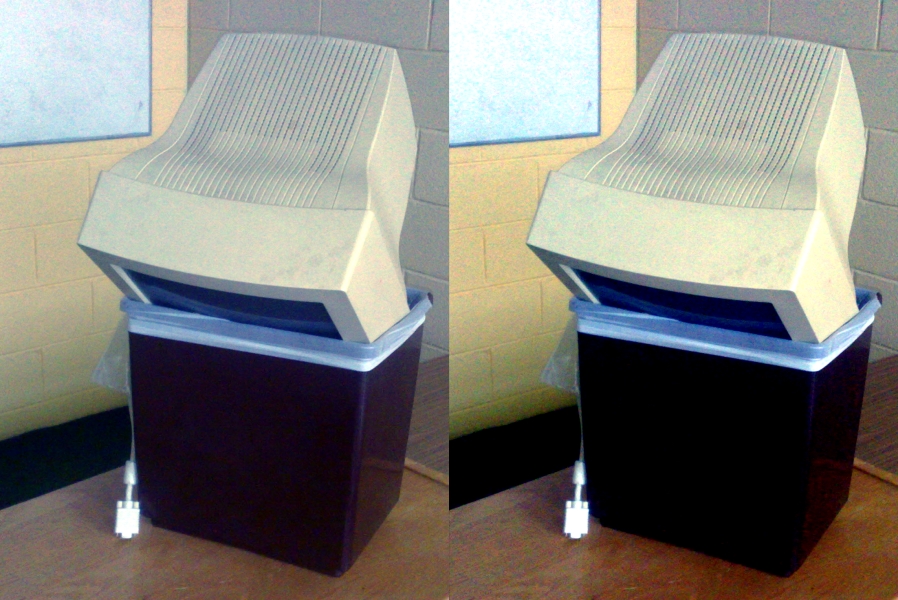
Old Computer by Sean MacEntee. Old Computer is a surprisingly rare beast: a freely licenced photo of a computer that is being discarded. I find it easy to find great photos for search terms like apple or pen, less so for “computer in trash”. It’s a problem when you write complaints about computers a lot.
Old Computer has two major limitations if you wanted it for your condemnation of the tech industry or your rage at discarding electronics into landfill:
it’s “flat” colour-wise: there’s a lot of very similar beige-y colours in the image
there’s a lot of classroom in the shot and not a lot of computer-in-bin
by Sean MacEntee
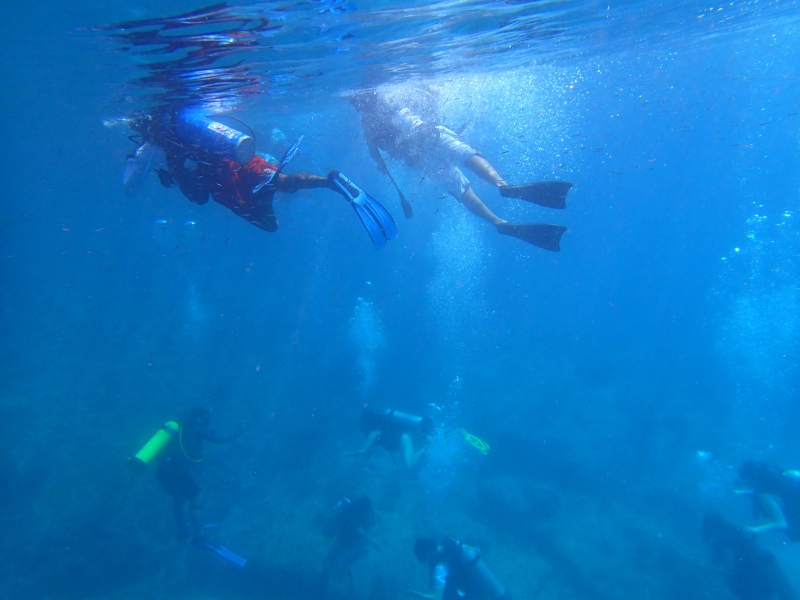
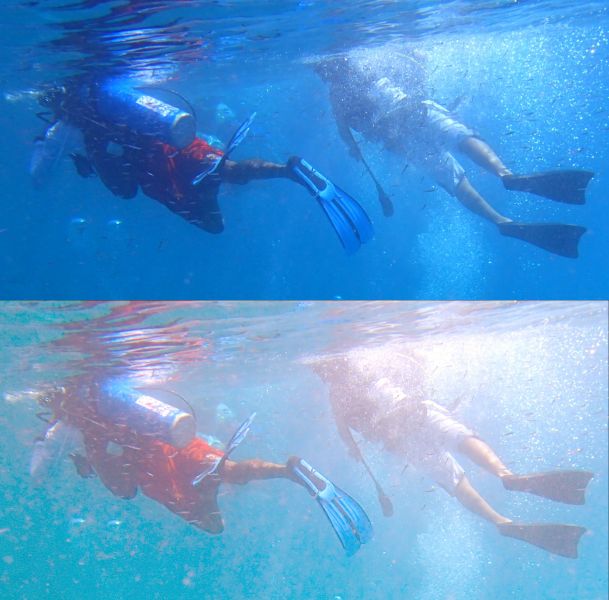
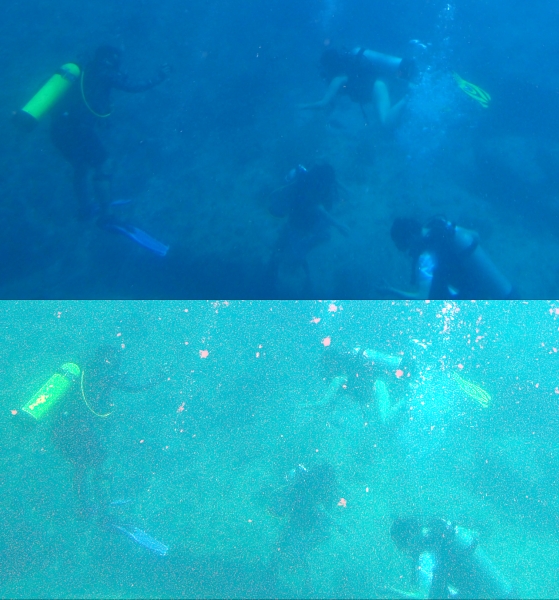
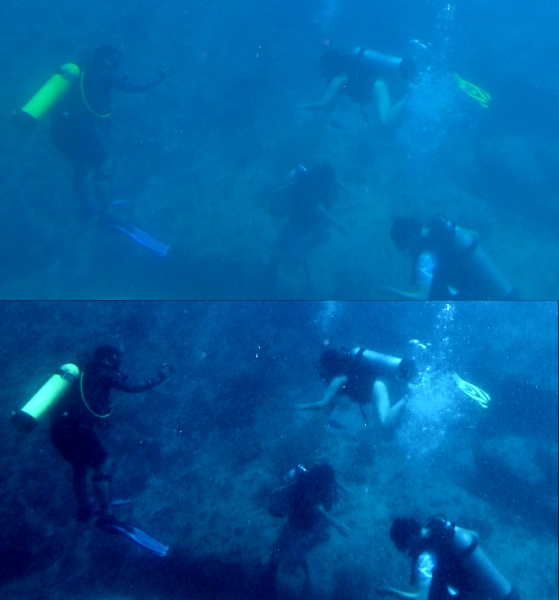
PC270246 by NickDun (hereafter called SCUBA). This is a very evocative shot of what scuba diving in a group is like and would be a great addition to your story of getting your mask kicked off by that so-and-so who probably certified yesterday, but:
it’s a very typical shot taken with an underwater camera, that is, it’s extremely blue-tinted
there’s a lot going on in it; if you want to talk about sunlight and freedom, or if you want to talk about crowds of divers, you may only want to illustrate your post with part of the image
by NickDun CC BY-SA
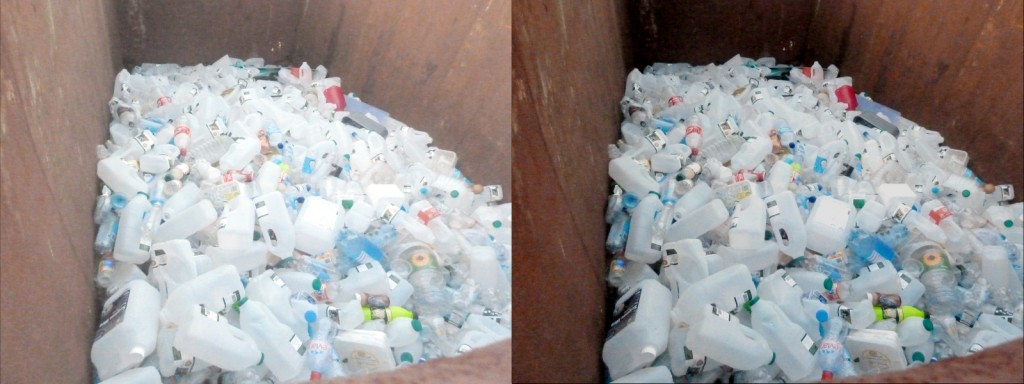
Big Rubbish Project: Eden Project 2011 by University of Exeter (hereafter called Big Rubbish). What can I say? Garbage is a versatile metaphor and images of garbage are useful. This image is visually striking: there’s lots of repetition and patterns, and not a lot of extraneous clutter in the surrounding scene. But it also has rather dim, flat colours.
by University of Exeter
Step 1: crop
Old Computer has an issue with a lot of surrounding space; and SCUBA has two separate things going on in it. This we are going to fix by cropping the image. Cropping means cutting out some of the photo. Where possible, you want to cut out other unrelated objects, and large expanses of foreground and background.
Cropping principle: have the object of interest filling most of the photo, slightly off center.
In Pinta, select the Rectangle Select tool, drag to draw a rectangle over the bits of the image you want to keep, and then go to the Image menu and select Crop to Selection.
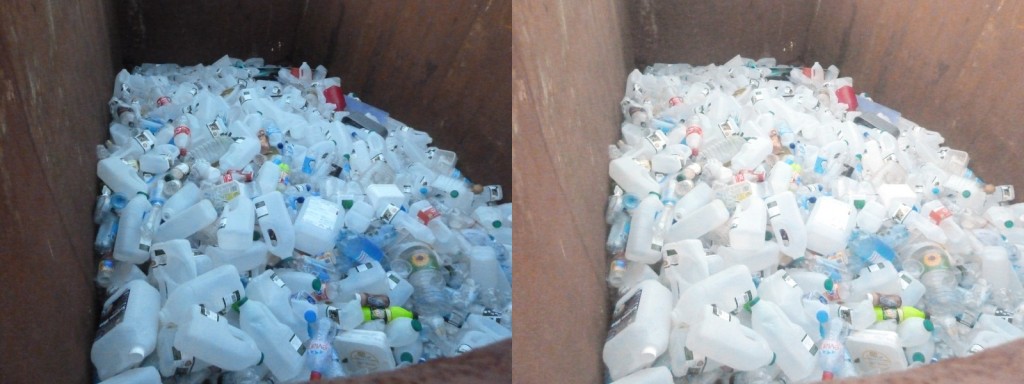
Old Computer, cropped so that the computer and the bin occupy much more of the image:
by Sean MacEntee, cropped by Mary Gardiner
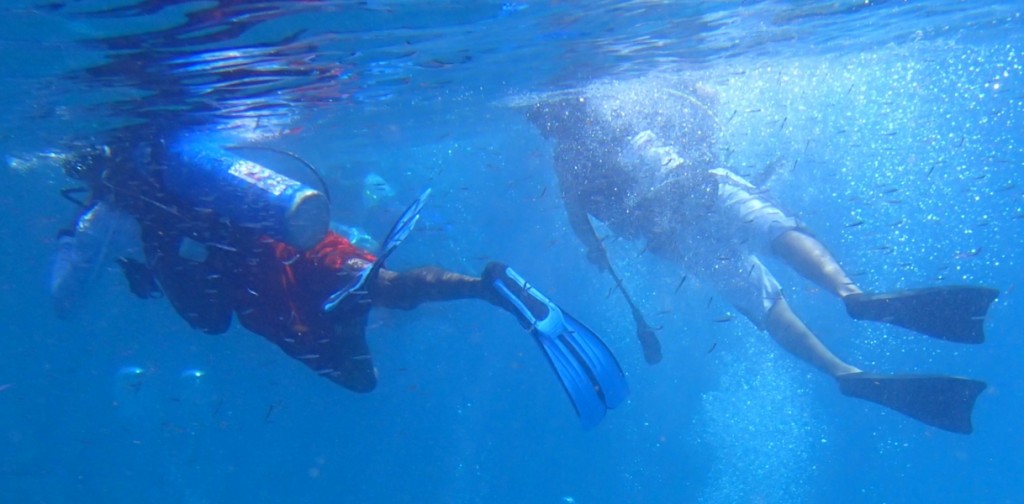
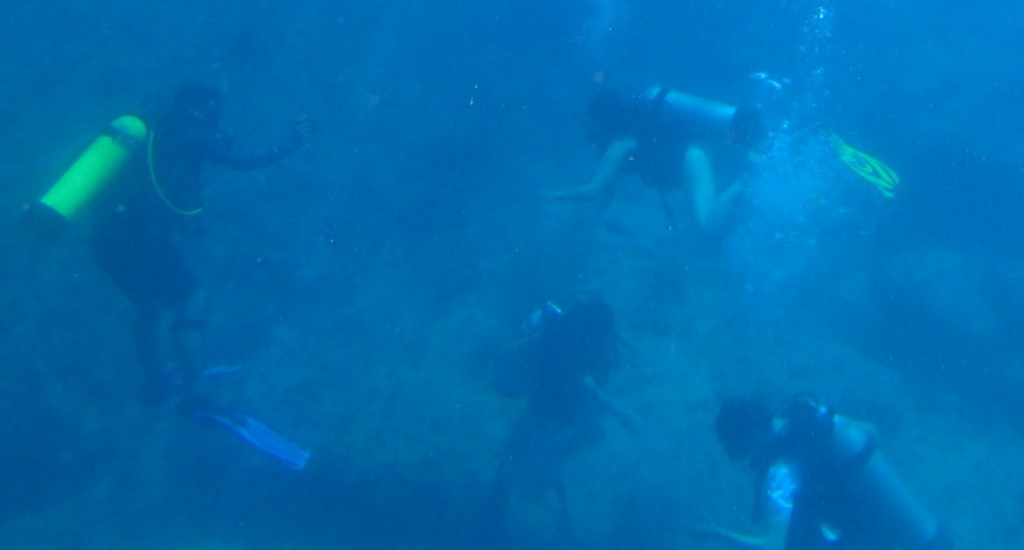
And two crops of SCUBA, the first showing the divers snorkelling at the top of the image and the second showing the divers grouped at the bottom:
by NickDun, cropped by Mary Gardiner, CC BY-SA
by NickDun, cropped by Mary Gardiner, CC BY-SA
Honestly I’m a bit sad to crop SCUBA, because the full image is so evocative of the last two or three minutes of SCUBA dives. Let this serve as a lesson: none of this editing is compulsory. Sometimes let less be more.
I’m even more loath to crop Big Rubbish, since as I noted at in its introduction I quite like its current framing. But one possibility with cropped is to change the message of the picture a little. For example, here’s a crop that implies that the extent of the garbage could be much larger:
by University of Exeter, cropped by Mary Gardiner
An even tighter crop, taking out the edges on the bottom and right could imply that it wasn’t well contained.
Having made that illustrative crop, I’ll go back to working with the full version of Big Rubbish in future steps.
Further reading:Rule of Thirds for a guideline on centering or not centering your object of interest.
Step 2: auto level
At the start, we saw that all of Old Computer, SCUBA, and Big Rubbish have “flat colours”. “Auto level” commands are the simplest way to get a good variety of colour levels to diminish this effect.
In Pinta, go to the Adjustments menu, and select Auto Level.
The effect on Big Rubbish is most dramatic and most of an improvement for eye-catching purposes (original on left, auto-levelled on right):
by University of Exeter, duplicated and colour-adjusted by Mary Gardiner
Contrary to (my) expectations, the effect on Old Computer is extremely subtle (original on left, auto-level on right):
by Sean MacEntee, cropped, duplicated, and colour adjusted by Mary Gardiner
But don’t worry, we’re not stopping here with jazzing up Old Computer.
The effect on the two SCUBA shots is dramatic, as it often is with underwater shots. Here’s the top one (original image at top, auto-level at bottom):
by NickDun, cropped, duplicated and colour-adjusted by Mary Gardiner, CC BY-SA
You’ll notice that while the range of colours in the auto-levelled picture is wider, it has not ended up looking especially realistic. Realistic high-fidelity underwater photographs are not easy to produce… but luckily realistic is not our goal here; our goal is striking.
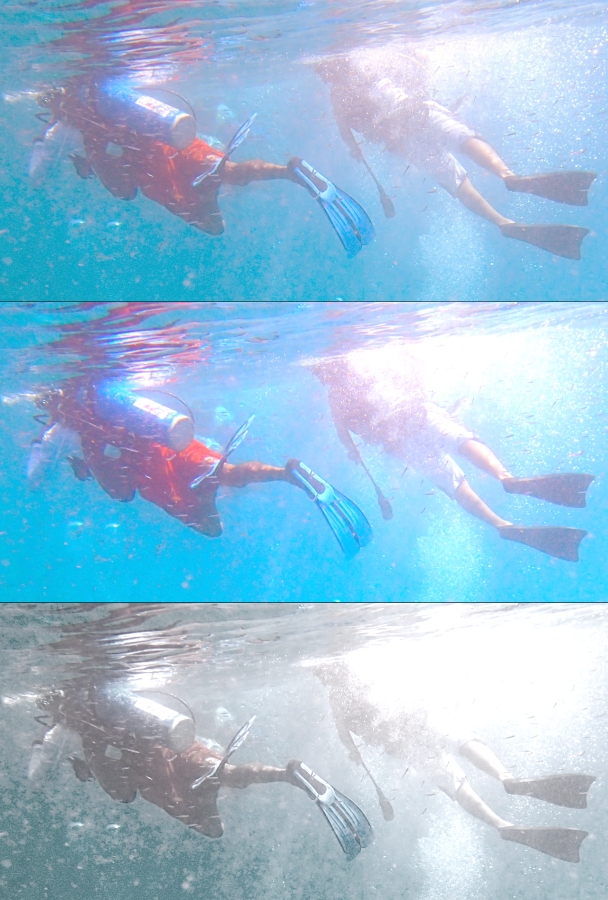
Sadly, the bottom crop of SCUBA is pushing the limits of colour adjustment: if there’s really only blue in the picture, auto-level will find red where-ever it can, no matter how ill-advised (original image at top, auto-level at bottom):
by NickDun, cropped, duplicated and colour-adjusted by Mary Gardiner, CC BY-SA
Not so great. But give auto-levelling a go with any picture you are trying to edit; there’s always an Undo command.
Step 3: increase contrast and saturation
Increasing contrast increases the distinctness of the colours in the image (beyond auto-level); and increasing saturation increases their richness.
In Pinta, go to the Adjustments menu, and choose “Brightness / Contrast” for a contrast slider, and “Hue / Saturation” for a saturation slider.
Here’s Old Computer, with the Saturation slider (which starts at 100) increased to 150, and the Contrast slider (which starts at 0) increased to 30 (auto-levelled version on left, higher contrast and saturation version on right):
by Sean MacEntee, cropped, duplicated, and colour adjusted by Mary Gardiner
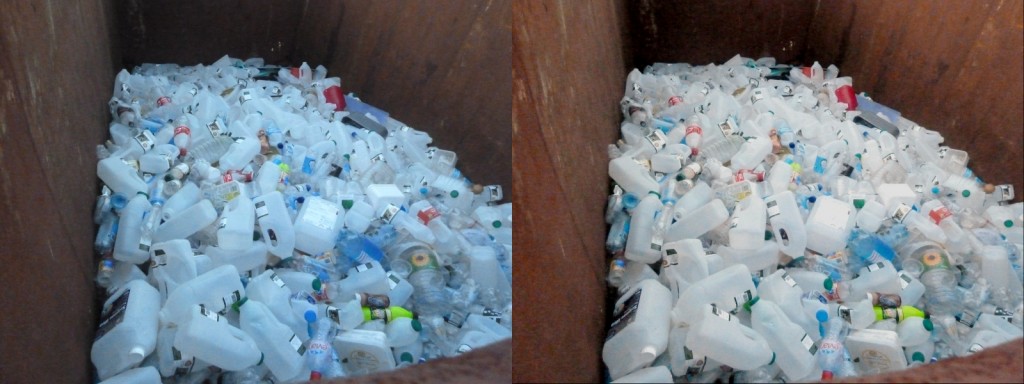
And here’s Big Rubbish, with three adjustments. I took Saturation to 130, contrast up to 20, and brightness down to -50 (auto-levelled version on left, higher contrast, higher saturation version, and lower brightness version on right):
by University of Exeter, duplicated and colour-adjusted by Mary Gardiner
Since I’ve made it darker again, and thus more like the original, let’s keep ourselves honest and compare with the original too (original on left, auto-levelled with lower brightness, higher contrast, and higher saturation version on right):
by University of Exeter, duplicated and colour-adjusted by Mary Gardiner
Our version has a lot more red: the bottles are white rather than blue, and the rusty bin has a warm red tone (partly due to auto-levelling and partly due to increasing the saturation dramatically). So auto-levelling and messing with the colours paid off even though I went and reduced the brightness back down to close to the original.
Saturation is a very powerful slider: make your colours richer by increasing saturation.
That said, sometimes you can do a lot just with contrast. Remember what a mess auto-levelling made of the bottom SCUBA picture? I didn’t give up there. Here’s a version based on the original, with brightness increased to 20 and contrast to 70 (original crop on top, higher contrast and higher brightness version on bottom):
by NickDun, cropped, duplicated and colour-adjusted by Mary Gardiner, CC BY-SA
Here manually fiddling with brightness and contrast has pulled some detail out of the picture that auto-levelling didn’t manage to find, and made it much more striking while retaining the other-worldly darkness of SCUBA diving. (Spoiler: your eyes are better than cameras at adjusting, it doesn’t seem that dark while you’re doing it. But you might want to convince your readers or listeners that it is spooky-dark…)
Step three alternative: decrease saturation
Upping saturation to make your rust warm, and your water an inviting sunny-day blue can be very effective, but it’s also worth checking out what effect you get from dialling saturation both ways.
Here’s the top of the SCUBA shot (top version auto-levelled, middle version auto-levelled with contrast increased to 20 and saturation increased to 155, bottom version with contrast increased to 35 and saturation decreased to 25):
by NickDun, cropped, duplicated and colour-adjusted by Mary Gardiner, CC BY-SA
Both of the edits have something to recommend them: the more saturated version in the middle looks like the sunniest dive day in the history of time, and the less saturated version at the bottom looks ethereal and dramatic; my favourite edit that I produced for this post. Try dialling saturation down sometimes, not always and forever up.
And that’s it: you have your basic dials to catch eyes now!
Two minutes to more eye-catching photos
Full disclosure: you’ll have to do a bit of practice to develop your own taste. But here’s your quick steps when you have a photo that could use a bit of “pop” before being added to your writing or your slide deck:
crop the image so that the subject of interest comprises most of the image, and is off-center
try auto-level colour adjustments
try somewhat increasing one or more of contrast and saturation, perhaps while twiddling brightness up or down
also try decreasing saturation
And so wordsmith types: go forth and give people brain candy!